| Version | Date | Tech | Notes |
| 1.0 | 2021-05-01 | Raj Goel, CISSP raj@brainlink.com / 917-685-7731 | Initial Version Developed using brainlink’s SOPCULTURE technology |
Purpose: I assisted a client with getting their NUTANIX Cluster installed. Nutanix support was excellent and I knew this was a technology I wanted to play with. So I built my own HIGH-PERFORMANCE COMMODITY NUTANIX Cluster
NUTANIX Commodity Cluster Bill of materials
| 1 | HDMI Extension cable https://www.amazon.com/gp/product/B08GPMQMPS |
| 1 | 3-way HDMI Splitter https://www.amazon.com/gp/product/B06VX1PKQ7 |
| 1 | Logitech Wireless keyboard & Mouse https://www.amazon.com/gp/product/B079JLY5M5 |
| 3 | 128GB Corsair RAM bundles https://www.amazon.com/gp/product/B085WQXKM2 |
| 3 | Asus D700SC https://www.amazon.com/gp/product/B09TLG7FCF |
| 3 | 10GB SFP NICs https://www.amazon.com/gp/product/B06X9T683K |
| 3 | SFP+ cables https://www.amazon.com/gp/product/B00U8BL09Q |
| 1 | MicroTIK 4-port 10GB Switch https://www.amazon.com/gp/product/B07LFKGP1L/ |
| 3 | 500GB Samsung 2.5 inch SSD https://www.amazon.com/gp/product/B08QBMD6P4 |
| 3 | Sabrent 4TB NVME SSD https://www.amazon.com/gp/product/B08VF99PV8 |
| Step | Task | Screenshot |
|---|---|---|
| 1 | Unpack each of the PCs Per-server parts | 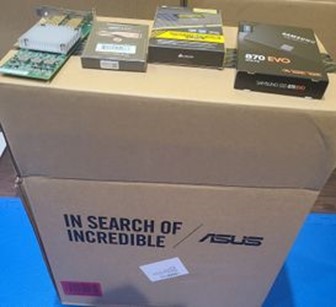 |
| 2 | Remove Thumb screws & remove the side panel |  |
| 3 | Press the 4 plastic tabs to remove the front cover Press the metal tab to rotate the front assembly 90 degrees |  |
| 4 | Install 128GB Memory 10GB NIC 4TB NVME under the fan shroud 2.5” SATA SSD | 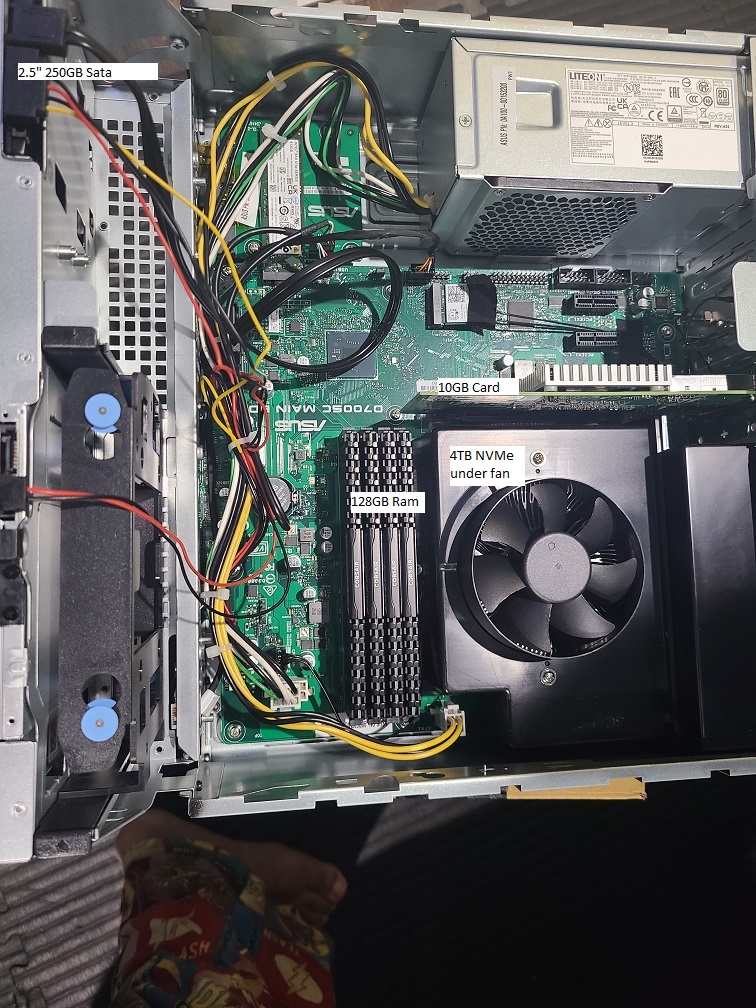 |
| 5 | Close the case | |
| 6 | Connect the Servers via the 10GB SFP+ cables to the MicroTik switch Connect Microtik via ethernet to your network | |
| 7 | Download the NUTANIX COMMUNITY EDITION ISO from https://www.nutanix.com/products/community-edition | |
| 8 | Burn the ISO to a USB key using Rufus (on windows) | |
| 9 | Boot EACH PC off the USB | |
| 10 | MY IP CONFIGURATION: (Yours should match YOUR LAN IP schema!) NODE1: 10.10.18.211 / Netmask: 255.255.25.0 / Gateway: 10.10.18.1 NODE2: 10.10.18.212 / Netmask: 255.255.25.0 / Gateway: 10.10.18.1 NODE3: 10.10.18.213 / Netmask: 255.255.25.0 / Gateway: 10.10.18.1 CVM1: 10.10.18.221 / Netmask: 255.255.25.0 / Gateway: 10.10.18.1 CVM2: 10.10.18.222 / Netmask: 255.255.25.0 / Gateway: 10.10.18.1 CVM3: 10.10.18.223 / Netmask: 255.255.25.0 / Gateway: 10.10.18.1 | |
| 11 | PING ALL NODES & CVM Servers All 6 servers should be up before proceeding | #NODE 1 ping 10.10.18.211 #NODE 2 ping 10.10.18.212 #NODE 3 ping 10.10.18.213 #CVM 1 ping 10.10.18.221 #CVM 2 ping 10.10.18.222 #CVM 3 ping 10.10.18.223 |
| 12 | Ssh into the 1st Node | e.g. ssh root@10.10.18.211 |
| 13 | Check CVM Status | virsh list –all Id Name State —————————————————- 1 NTNX-83cc7baf-A-CVM running |
| 14 | SSH into the 1st CVM | ssh nutanix@10.10.18.221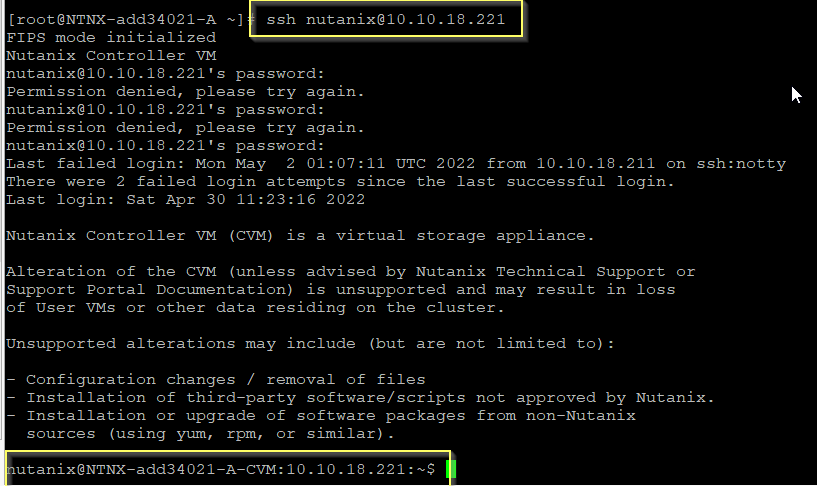 |
| 14 | Confirm you can ping ALL NODES & CVMs | #NODE 1 ping 10.10.18.211 #NODE 2 ping 10.10.18.212 #NODE 3 ping 10.10.18.213 #CVM 1 ping 10.10.18.221 #CVM 2 ping 10.10.18.222 #CVM 3 ping 10.10.18.223 |
| 16 | Create your cluster from ANY CVM | cluster -s 10.10.18.221,10.10.18.222,10.10.18.223 create |
| 17 | After cluster has been created, set NTP & DNS | ## SSH into ANY CVM ssh nutanix@10.10.18.221 ## Set DNS ncli cluster get-name-servers ncli cluster add-to-name-servers servers=”10.10.18.1″ ncli cluster get-name-servers ## Set NTP ncli cluster get-ntp-servers ncli cluster add-to-ntp-servers servers=”pool.ntp.org” ncli cluster get-ntp-servers |
| 18 | Login to PRISM | https://10.10.18.223:9440/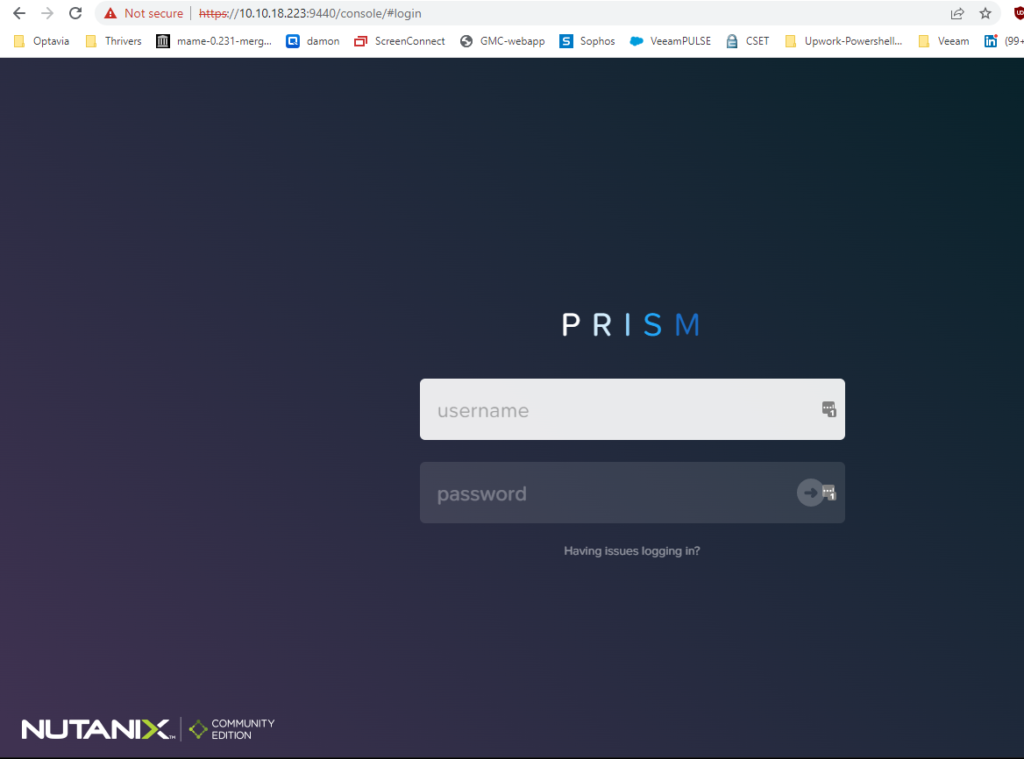 |
| 19 | Rename your cluster & set Cluster IP | 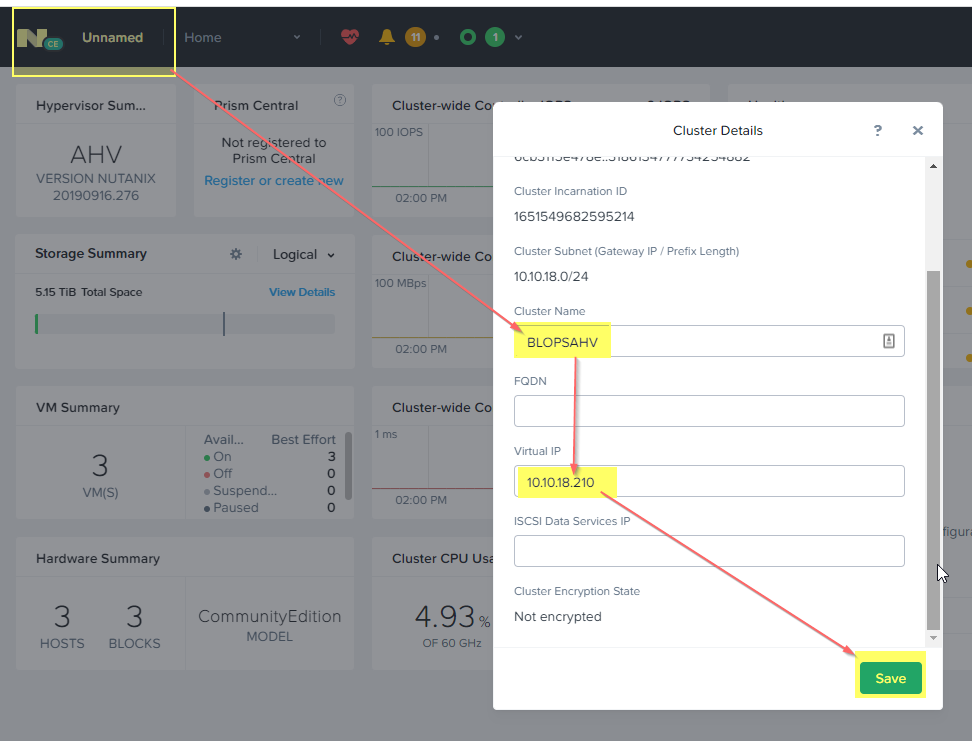 |
| 20 | Cluster dashboard | 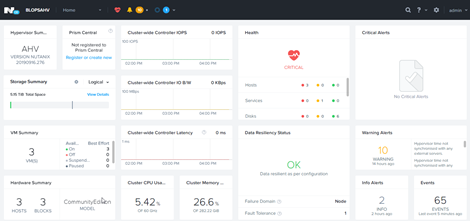 |
| 21 | <SOP READY for team Review> |
| Version | Date | Tech | Notes |
| 1.0 | 2021-05-01 | Raj Goel, CISSP raj@brainlink.com / 917-685-7731 | Initial Version Developed using brainlink’s SOPCULTURE technology |
Purpose: I assisted a client with getting their NUTANIX Cluster installed. Nutanix support was excellent and I knew this was a technology I wanted to play with. So I built my own HIGH-PERFORMANCE COMMODITY NUTANIX Cluster
NUTANIX Commodity Cluster Bill of materials
| 1 | HDMI Extension cable https://www.amazon.com/gp/product/B08GPMQMPS |
| 1 | 3-way HDMI Splitter https://www.amazon.com/gp/product/B06VX1PKQ7 |
| 1 | Logitech Wireless keyboard & Mouse https://www.amazon.com/gp/product/B079JLY5M5 |
| 3 | 128GB Corsair RAM bundles https://www.amazon.com/gp/product/B085WQXKM2 |
| 3 | Asus D700SC https://www.amazon.com/gp/product/B09TLG7FCF |
| 3 | 10GB SFP NICs https://www.amazon.com/gp/product/B06X9T683K |
| 3 | SFP+ cables https://www.amazon.com/gp/product/B00U8BL09Q |
| 1 | MicroTIK 4-port 10GB Switch https://www.amazon.com/gp/product/B07LFKGP1L/ |
| 3 | 500GB Samsung 2.5 inch SSD https://www.amazon.com/gp/product/B08QBMD6P4 |
| 3 | Sabrent 4TB NVME SSD https://www.amazon.com/gp/product/B08VF99PV8 |
| Step | Task | Screenshot |
|---|---|---|
| 1 | Unpack each of the PCs Per-server parts | |
| 2 | Remove Thumb screws & remove the side panel | |
| 3 | Press the 4 plastic tabs to remove the front cover Press the metal tab to rotate the front assembly 90 degrees | |
| 4 | Install 128GB Memory 10GB NIC 4TB NVME under the fan shroud 2.5” SATA SSD | |
| 5 | Close the case | |
| 6 | Connect the Servers via the 10GB SFP+ cables to the MicroTik switch Connect Microtik via ethernet to your network | |
| 7 | Download the NUTANIX COMMUNITY EDITION ISO from https://www.nutanix.com/products/community-edition | |
| 8 | Burn the ISO to a USB key using Rufus (on windows) | |
| 9 | Boot EACH PC off the USB | |
| 10 | MY IP CONFIGURATION: (Yours should match YOUR LAN IP schema!) NODE1: 10.10.18.211 / Netmask: 255.255.25.0 / Gateway: 10.10.18.1 NODE2: 10.10.18.212 / Netmask: 255.255.25.0 / Gateway: 10.10.18.1 NODE3: 10.10.18.213 / Netmask: 255.255.25.0 / Gateway: 10.10.18.1 CVM1: 10.10.18.221 / Netmask: 255.255.25.0 / Gateway: 10.10.18.1 CVM2: 10.10.18.222 / Netmask: 255.255.25.0 / Gateway: 10.10.18.1 CVM3: 10.10.18.223 / Netmask: 255.255.25.0 / Gateway: 10.10.18.1 | |
| 11 | PING ALL NODES & CVM Servers All 6 servers should be up before proceeding | #NODE 1 ping 10.10.18.211 #NODE 2 ping 10.10.18.212 #NODE 3 ping 10.10.18.213 #CVM 1 ping 10.10.18.221 #CVM 2 ping 10.10.18.222 #CVM 3 ping 10.10.18.223 |
| 12 | Ssh into the 1st Node | e.g. ssh root@10.10.18.211 |
| 13 | Check CVM Status | virsh list –all Id Name State —————————————————- 1 NTNX-83cc7baf-A-CVM running |
| 14 | SSH into the 1st CVM | ssh nutanix@10.10.18.221 |
| 14 | Confirm you can ping ALL NODES & CVMs | #NODE 1 ping 10.10.18.211 #NODE 2 ping 10.10.18.212 #NODE 3 ping 10.10.18.213 #CVM 1 ping 10.10.18.221 #CVM 2 ping 10.10.18.222 #CVM 3 ping 10.10.18.223 |
| 16 | Create your cluster from ANY CVM | cluster -s 10.10.18.221,10.10.18.222,10.10.18.223 create |
| 17 | After cluster has been created, set NTP & DNS | ## SSH into ANY CVM ssh nutanix@10.10.18.221 ## Set DNS ncli cluster get-name-servers ncli cluster add-to-name-servers servers=”10.10.18.1″ ncli cluster get-name-servers ## Set NTP ncli cluster get-ntp-servers ncli cluster add-to-ntp-servers servers=”pool.ntp.org” ncli cluster get-ntp-servers |
| 18 | Login to PRISM | https://10.10.18.223:9440/ |
| 19 | Rename your cluster & set Cluster IP | |
| 20 | Cluster dashboard | |
| 21 | <SOP READY for team Review> |